I had a long discussion the other day with a friend about how cupcakes and adorable cupcake shops have become really popular. We wondered if cupcake shops were the new frozen yogurt. (Which before that frozen yogurt was the new marble slab ice cream shop which was the new krispy kreme donut which was the new coffee shop which I think was actually the new frozen yogurt shop from the first time around, etc). This made us worry that our cupcake trend would shortly be going away. (It is good to know that with mounting national debt, health care debate worries, and double digit nationwide unemployment, we can still find time to talk about really important things.)
But I do not think cupcakes are going any where. One of the things I think is great about a cupcake is that it allows experimentation with flavors that would really not work on a whole cake. As exhibit A, I submit this banana cupcake with peanut butter frosting. It is just enough without being cloying or overwhelming. As with cupcakes in general, it hits that great nostalgic note.
The cupcake recipe is from Martha Stewart. The frosting is from Ina Garten. Ina's original recipe was to put the peanut butter frosting on chocolate cupcakes. A grand idea. I think it found it's true match with the banana cupcakes. When I proposed the combination to my husband he shrugged his shoulders in disinterest. However, the next day, he ate four of them. Long live the cupcake !
Banana Cupcakes with Peanut Butter Frosting
Banana Cupcakes
makes 28 cupcakes
3 cups sifted cake flour (not self-rising)
1 1/2 teaspoons baking soda
3/4 teaspoon baking powder
3/4 teaspoon salt
1 teaspoon ground cinnamon
6 ounces (1 1/2 sticks) unsalted butter, softened
1 1/2 cups packed light-brown sugar
3 large eggs
4 very ripe large bananas, mashed (about 2 cups)
3/4 cup buttermilk
1/2 teaspoon pure vanilla extract
1) Preheat oven to 350 degress. Line standard muffin tins with paper liners.
2) Whisk dry ingredients in a large bowl: cake flour, baking soda, baking powder, salt, and cinnamon. In a separate bowl, mix the following wet ingredients together: mashed bananas, buttermilk and vanilla.
3) Cream butter and brown sugar with a mixer until light and fluffy. Add eggs, 1 at a time, beating after each addition.
4) Reduce speed to low. Add dry ingredients to butter mixture in 3 additions, alternating with wet ingredients and ending with dry. Scrape sides of bowl. Divide batter among muffin cups, filling each 2/3 full.
5) Bake cupcakes until testers inserted into centers come out clean, about 20 minutes. Let cool in tins on wire racks. Cupcakes with keep, covered, for up to 3 days.
Kathleen's Peanut Butter Frosting
1 cup confectioners' sugar
1 cup creamy peanut butter
5 tablespoons unsalted butter, at room temperature
3/4 teaspoon pure vanilla extract
1/4 teaspoon kosher salt
1/3 cup heavy cream
1) Place the confectioners' sugar, peanut butter, butter, vanilla, and salt in the bowl of an electric mixer fitted with the paddle attachment.
2) Mix on medium-low speed until creamy, scraping down the bowl with a rubber spatula as you work.
3) Add the cream and beat on high speed until the mixture is light and smooth.
4) Allow cupcakes to cool completely before frosting.
Tuesday, April 13, 2010
Friday, April 9, 2010
Scones
When we were children, my sisters and I loved to play tea party. (That is not a completely true statement since we still love to play tea party. ) We had lovely little tea sets hand painted with forget-me-not flowers and with our friends we would dress up and pretend to be proper (or our version of what we thought proper was.)
Scones never made an appearance at those early parties (I actually cannot recall what our menus consisted of) but for me a fresh baked scone with tea is pretty close to perfection. When my sisters and I go out to tea now, one of the things I look forward to are the scones. Yes, there are some sugary sweet delights to be had at all kinds of coffee houses, but they are nothing in comparison to the buttery, light, flaky heaven that these are. These scones are in the "British style" because they do not have a glaze. I promise, you won't miss it.
The recipe below is from the magazine Everyday Food. I believe it originally appeared around Thanksgiving which is why the recipe calls for fresh cranberries. They are quite good in a scone, but please feel free to substitute other dried or fresh berries depending on your mood and the season. My recent favorite is dried wild blueberries with a little lemon zest. The scones pictured were made with dried cherries.
As with so many recipes I love, these scones can be completely made the night before up to the baking stage. This makes it easy for oven warm scones for tea time (or breakfast or a nice morning treat for deserving co-workers).
Cranberry Scones
2 cups all purpose flour, plus more for work surface
5 tablespoons sugar, plus 1 tablespoon for topping
1 tablespoon baking powder
1/2 teaspoon salt
6 tablespoons chilled unsalted butter, cut into small pieces
2/3 cup half-and-half, plus 1 tablespoon for topping
1/2 cup halved cranberries, drained on paper towels
1) Preheat the oven to 425 degrees. In a bowl, whisk together flour, 5 tablespoons sugar, baking powder, and salt.
2) Cut in butter with a pastry blender or two knives until mixture resembles coarse crumbs.
3) Stir in 2/3 cup half-and-half until just moistened. Gently fold in cranberries.
4) On a lightly floured surface , knead dough gently, 5 to 10 times. Pat into a 1 inch thick round. Cut into 8 wedges. Place on a baking sheet, 2 inches apart. (If making in advance, this is where I pause: place the scones on a baking sheet, wrap with plastic wrap and place in the fridge until ready for baking.)
5) Brush tops with remaining tablespoon half-and-half; sprinkle with remaining tablespoon sugar. Bake until golden brown, 12 to 15 minutes. Let cool on a wire rack. (I like to use sugar in the raw instead of regular granulated sugar to give the top a nice shimmery crunch. Also, if the scones have been in the fridge for a few hours or overnight, I usually add a couple of minutes to the bake time).
Tuesday, April 6, 2010
Scalloped Potatoes
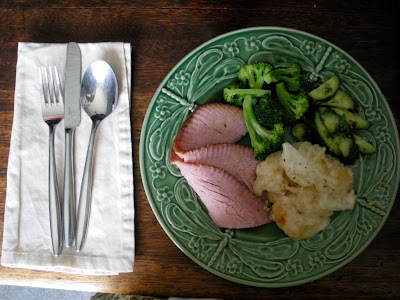
These potatoes are the comfort food for my husband. For those of us who have only ever had the box dehydrated scalloped potatoes, they are a kind of revelation. Layers of thinly sliced potatoes surrounded in a faintly onion scented sauce-so lovely and really pretty simple. It is this recipe that taught me how to make simple white sauce and I have found it useful as a base in all kinds of casseroles, pasta and au gratin dishes.
It is great alongside holiday ham but also a helpful way to stretch leftovers. Just layer in diced ham along with the potatoes. The recipe is from Betty Crocker's Best Loved Recipe Cookbook.
Scalloped Potatoes
6 medium boiling or baking potatoes (2 lbs)
3 tablespoons butter (I actually think 4 tablespoons is perfect)
1 small onion, finely chopped (1/4 cup)
3 tablespoons all-purpose flour
1 teaspoon salt
1/4 teaspoon pepper
2 1/2 cups milk
1 tablespoon
1) Heat oven to 350 degrees. Grease bottom and side of 2 quart casserole with shortening.
2) Scrub potatoes; peel if desired. Cut into enough thin slices to measure about 4 cups.
3) Melt 3 tablespoons butter in 2 quart saucepan over medium heat. Cook onion in butter about 2 minutes, stirring occasionally, until tender.
4) Stir in flour, salt and pepper. Cook, stirring constantly, until smooth and bubbly; remove from heat.
5) Stir in milk. (Stir in slowly to incorporate and make a smooth mixture. If the milk is poured in all at once, the sauce can become lumpy.) Heat to boiling, stirring constantly. Boil and stir 1 minute.
6) Spread potatoes in casserole. Pour sauce over potatoes. Dot with 1 tablespoon butter. (I layer the potatoes and sauce kind of like I'm making lasagna. If I'm adding diced ham, it is another layer in this process).
7) Cover and bake 50 minutes. Uncover and bake 1 hour to 1 hour 10 minutes longer or until potatoes are tender. Let stand 5 to 10 minutes before serving.
Because of demand, I can safely say I have always doubled (or tripled or quadrupled) this recipe. If doubling the recipe, I do recommend keeping it split into two baking dishes. If one baking dish is used for a double recipe, it has to bake for about 25 minutes longer and the bottom gets a tad more cooked than is generally cared for.
Saturday, April 3, 2010
Chocolate Bird Nests
Frankly, these are just adorable. They are easy peasy, chocolaty adorableness. They are obviously an excellent choice for Easter celebrations and can do double duty as both table decoration and dessert. However, I think that they could be equally charming at an appropriately themed baby shower.
The colored chocolate shell egg candies are made by Cadbury and are my all time favorite Easter candy. I love the way the robins egg blue looks with chocolate, but feel free to not be limited by my own color obsessions.
I have to give credit where credit is due and acknowledge that the gift bag presentation below was my husbands idea for how I could use up the extra non-blue candy eggs. I put a layer of the chocolate eggs at the bottom of a cellophane bag and then placed the chocolate bird nest on top. They turned out pretty stinkin' cute.
Chocolate Bird Nests
1 12 oz bag semi sweet chocolate chips
1/3 cup peanut butter
3 1/2 cups chow mein noodles
1) Place the chocolate chips in a large microwave safe bowl. Microwave for 1 minute. Stir. Add the peanut butter and stir again. Microwave for another 1 to 2 minutes until the chocolate and peanut butter are melted and smooth.
2) Add the chow mein noodles to the chocolate/peanut butter mixture. Stir to coat noodles.
3) Cover a cookie sheet with wax paper. Drop large spoonfulls of the chocolate noodle mixture onto the waxed paper. Shape each mound lightly with the spoon (or fingers) into a nest shape.
Place the chocolate eggs into the nests.
4) Let set, uncovered, for several hours (over night is best) until the chocolate hardens. If storing, be sure to place wax paper between layers.
Note: I am aware that these days quite a number of people have peanut allergies. The peanut butter can easily be left out.
Subscribe to:
Posts (Atom)